
Every year, it’s the same old thing. In the cold winter months, items just get thrown into the garage so we can rush into a warm home. The garage ends up becoming a dumping ground for many items. Sometimes there are so many items in a garage that your vehicle may not even fit! This is an ongoing issue for many who would like to park their vehicle(s) in the garage, but can’t. Just take a look down any street and see how many people are parking on the street. It truly is amazing!
Tackling an area like a garage organization is not a one-day, two-hour job. It typically takes the good part of the weekend (two days) and it’s dirty, dusty work. If you are sensitive to dust, you may want to have a facemask handy for some parts of this job.
So, if you’re ready to set aside the time and tackle your garage, here is a 10-step process to help you with your own garage organizing project:
1. Remove everything! Yes, you heard me. In order to do a good job, everything needs to be removed.
2. When you are removing items (perhaps putting them on the driveway or in your back yard), start grouping/sorting items into ‘like’ piles. This will make things easier further on down the road.
3. Sweep out and hose out the garage. If you have a large squeegee, then use it to remove excess water for quicker drying time. If you don’t have a squeegee, then expect a longer drying time. It is very important that the garage floor be totally dry before items start going back in (safety first).
4. While you are waiting for the garage floor to dry, look at all of the items that have been brought out. If you haven’t already, sort into ‘like’ piles.
5. Address each pile with an open mind. Are there items your family has outgrown and no longer uses? Are there duplicate items?
6. As you go through each pile, you may want to start three new piles: garbage, donate (or sell) and recycle.
7. Once you know what you would like to keep, assess if you need any containers, shelving, etc. Put off buying containers/shelving until this step. There are a variety of shelving/container options at various prices to suit any budget.
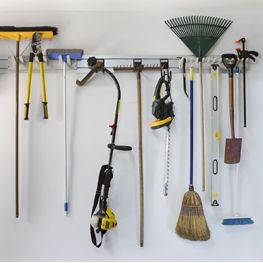
8. Try to resist placing items back on the garage floor. If possible, use the wall space (a pegboard for tools, shelving to house items, hooks, etc.).
9. Be sure to leave enough room so that you don’t bump a car door into any new shelving, bins, etc.
10. Take your garbage, donate and recycle items to where they need to go. Do not put those piles back in the garage for a later date.
Many people would love to have their garage organized, but most people don’t want to spend large amounts of money on a space they don’t live in. When we organize a garage, our main goal is for it to be functional for the individual or family. We certainly have clients who also want it to look pretty, but our main goal is for it to be organized so that it is easy to maintain the organization.
A few cost-efficient ways to organize a garage are:
Once everything has found a place in your garage, drive your vehicle in, close the garage door and take a nice long shower; you deserve it!
Sheri is the owner of Get It Together. An eye for details, she is able to proactively plan your entire renovation, including the design, ensuring that no item, no matter how small, is missed. For more information about Get It Together and Sheri’s services, visit gityyc.com.


Calgary’s Child Magazine © 2024 Calgary’s Child
