
Keeping kids entertained with crafts can get expensive. So, I’ve put together a list of crafts you can do using stuff you (probably) already have at home.
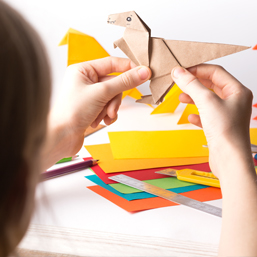
Origami
Our go-to craft on a rainy-day-in is origami. Origami is the Japanese art of folding paper into decorative shapes or figures.
You can use whatever paper you have on hand. There are a lot of tutorials on how to make origami on the internet. Search for a video tutorial on YouTube so you can follow step-by-step and have the option to pause whenever needed.
We make our origami crafts unique by drawing doodles on our plain white copy paper before making them into origami pieces.
DIY phone speaker
No need to buy that fancy Bluetooth speaker for your phone! Here’s how to DIY it.
You will need 2 paper or plastic disposable cups and a cardboard toilet paper roll. If you want to make this for your tablet, use a paper towel roll instead. In the middle of the cardboard toilet paper roll cut an opening that will fit the bottom of your phone vertically.
On the side of each cup, cut a hole that will fit each end of the toilet paper roll. Attach each end of the toilet paper roll into the cups with the cut-out side, you made earlier, facing upwards. Then decorate your speaker however you want.
Turn on the music and put your phone in the toilet paper roll to hold it in place. Now let’s dance!
Secret message
Secret messages are so much fun to make and pass around!
Squeeze into a container the juice of a lemon. Dip a cotton bud in the lemon juice and use it like a pen to write your message on a white piece of paper. Let the secret ink dry for a couple of minutes.
To unlock the hidden message, the recipient must put the paper close to a heat source. Make sure to have an adult supervise! You can use a candle or even try heating up the paper on the stove using a dry non-stick frying pan, or in the microwave.
Acid and base experiment
This is a great experiment for middle schoolers that are just learning about acids and bases.
Did you know that you can make your own acid/base indicator using red cabbage? No need for pH paper!
Make sure to have an adult supervise! Chop up a quarter of a red cabbage, place in a saucepan, and add enough water to cover the cabbage. Cook the mixture over low-medium heat long enough for the water to absorb the pigment from the cabbage, which will be about 15-20 minutes. After that, strain the mixture and discard the cabbage.
Place about a tablespoon of the resulting liquid in several clear containers. I recommend using clear plastic disposable mini cups or clear shot glasses. Add about a teaspoon of any liquid you want to test. Consider testing bleach, juice, pop, vinegar, hot sauce, and window cleaner. Any liquid that turns the indicator liquid red is an acid, and any liquid that turns it blue is a base.
Did you find more acids or bases at home?
Look Ma, no hands!
Challenge someone into crushing an empty can of pop without using their hands.
This is how you win this challenge: Prepare an ice bath by placing a generous amount of ice in a bowl that will fit the can of pop. Then fill up the container with water halfway.
Add a small amount of water into the empty pop can, just enough to cover the bottom of the can. Heat up the pop can on the stove top by placing it on top of a frying pan. Make sure to have an adult supervise! Once you see steam coming out of the can or hear the water boiling, use a pair of tongs, to pick up the can and place it upside down in the ice bath. Watch the can crush on its own!
Rock candy
After all that crafting and experimenting, I’m sure you’ll be craving something sweet. Let’s make some rock candies! Make sure to have an adult supervise.
Combine equal parts of water and sugar in a saucepan and heat until all the sugar is dissolved. Then slowly add more sugar into the saucepan, while mixing, until the sugar will no longer dissolve in the water. The water will start to look cloudy at this point. The amount of sugar to water should roughly be about 3:1. Add flavoring and coloring to your liking at this point, if available. Once the sugar solution is slightly cool, place in a clear glass jar. We used canning jars to easily observe the crystal formation.
Dip wooden skewers into water then roll them in sugar and set aside to dry. Once the skewers are dry, dip them into the sugar solution in the glass jar. Make sure that the skewers are not touching the bottom or the sides of the jar. We used clothes pins to hold the skewers in place. You can also use pipe cleaners to keep the skewers in place, too.
Now here’s where lots of patience is needed. It will take about a week for the candy to look like the store-bought rock candy your kids are used to. However, it is so much fun checking out the experiment daily and watching more and more sugar crystals form!
Now what are you waiting for? Let’s get crafting!
Fueled by strong coffee and a Gemini personality, Klynne shares ideas on living a minimal organized life full of adventures. For creative ideas on how to elevate frugal to luxury, visit thisfamilylifewelive.com. Tag her on Instagram to share your crafts at @thisfamilylifewelive!


Calgary’s Child Magazine © 2024 Calgary’s Child
